Restoration of an Oilfield Guard’s Forgotten Dagger!

Screws And Tools
@screwsandtoolsAbout
Hello I'm Alex! Thank you for attention and welcome to my channel. Screws and Tools is a channel dedicated to restoring old, antique, vintage, and rusty tools. I cover woodworking, metalworking (including non‑ferrous metals), leatherworking, knife making, and various DIY projects—all produced by me alone. I restore items such as knives, Caucasian daggers, swords, shashkas, sabers, cleavers, axes, and kitchen tools, continually honing my craft. And importantly, I always show my mistakes—because when you watch my videos, you learn not only from what works, but also from what doesn’t. I hope you enjoy my videos—thank you for watching! I truly appreciate every visit to my channel. Don’t forget to subscribe and join me on this restoration journey!
Latest Posts


Video Description
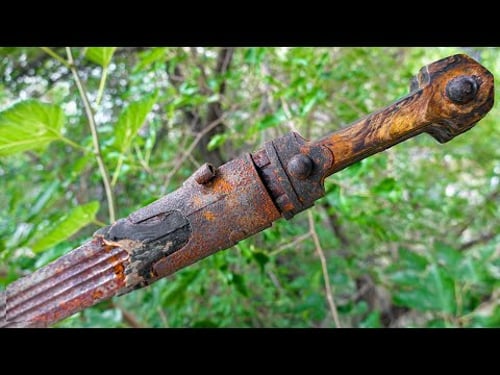
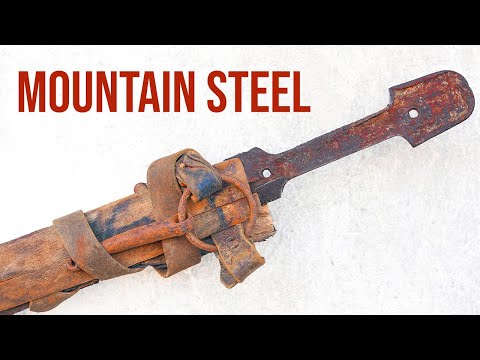
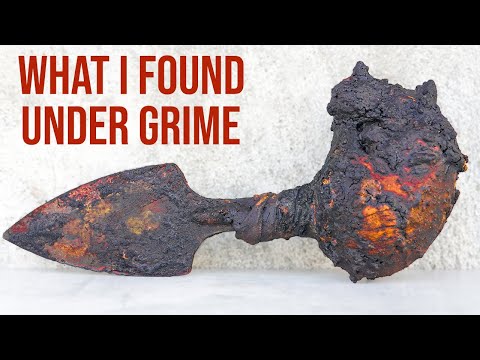
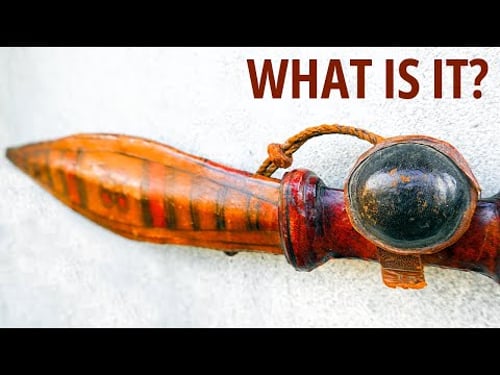
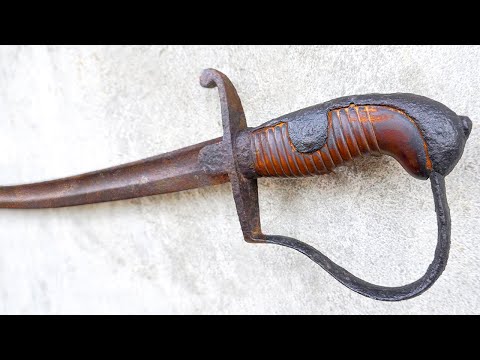
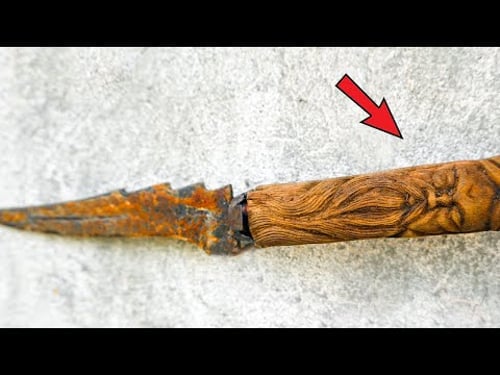
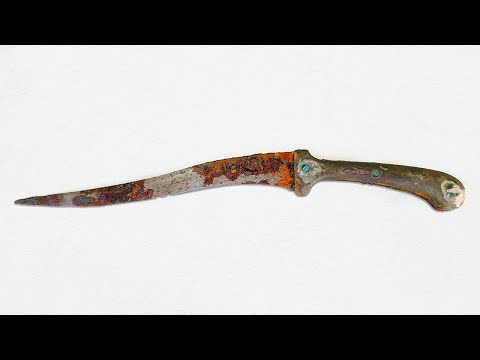
Hi, today I’m restoring an oilfield guard’s dagger from the 19th–20th centuries. A rather rare specimen. In all my years of work, this type of dagger came into my hands for the first time. The dagger is of Caucasian type. It was most likely made in the Tiflis or Kutaisi governorates of Georgia. The dagger's finish is simple: iron fittings, horn (buffalo) overlays for the handle, iron caps, and a thin strip of silver, which I discovered later during the restoration process. The condition of the item is terrible: the scabbard is missing — it’s broken, the fittings are rusted and partly rotted, the dagger is covered in rust. But the main thing is — all parts are intact. There is a musty smell, but now I’ll fix all of that. I’m starting the restoration of the dagger. First of all, I dismantled the fittings from the blade. They were stuck because rust tends to bind and glue iron parts, especially when iron comes into contact with wood. And the most interesting thing — for some reason, the fittings were put on backwards. That surprised me greatly, although I’ve seen it before. After that, using pliers, I removed the remains of old rotten wood from the upper and lower fittings and began cleaning. Of course, the cleaning of both the fittings and the dagger itself should be done with a sandblaster at various pressure levels. Sand cleaning is effective. While cleaning the sides of the handle with very low pressure, I discovered a silver strip. That made me very happy, although this is typical for daggers of the Caucasian type. After the cleaning, I began polishing, but first I additionally cleaned the surface of the fittings and the dagger with a soft iron brush. Then I started soldering the holes caused by deep metal corrosion. For this, I used acid and flux. As the main material for soldering, I used silver and a bit of copper to patch all the holes in the upper and lower fittings of the scabbard. Then I used a file to remove the excess, sanded the surface with sandpaper, cleaned it — and everything turned out just right. After all the technical steps, the fittings still looked old and retained their historical appearance. (That’s important!) Then I moved on to polishing the blade. Polishing the blade was easy — using a soft brush: iron, then brass, and of course, sandpaper. But even after all these processes, the blade preserved its history — which is very important. Additionally, I cleaned the sand that had gotten stuck between the handle overlays and removed all the grains. Then I moved on to restoring the silver strip on the sides of the dagger’s handle. (I did this for the first time.) To restore the silver strip on the sides of the handle, I used a pneumatic engraver. Cutting out the desired shape and line (which was still partially visible), I began carving the metal. I didn’t touch the old silver inlay. For the inlay, I used a silver wire with a diameter of 0.7 mm. After that, I cleaned the excess silver, blackened the edges of the handle, removed remaining rust using another engraver — and got a fully restored original look of the dagger’s side part. I’m very happy, although I did this procedure for the first time — and it was successful. The next step, of course, was the scabbard. It had to be made so that the upper and lower parts would match. That wasn’t easy, because the narrower the scabbard, the more pressure the fittings put on the blade inside. Of course, the first scabbard I made had a mistake — as usual. But I always show all my mistakes in my videos. I believe that’s very important! Then, on the second try, I managed to make the scabbard in the right shape and size. I processed it, covered it with natural black leather, and installed the fittings. The upper part I installed very, very tightly. The lower part — as usual — I glued in place so it wouldn’t fall off. By the way, as you may have noticed, glue was also used in the late 19th and early 20th centuries — it was a common practice. Some used small nails. After all the technical processes, I was happy to show you the final result. This was a difficult restoration, a long restoration — but it’s completed, and I hope you liked it. Please share this video. Thank you. Sincerely, Alex. Thanks for attention! Good luck and health to everyone! With best wishes, Alex! Please subscribe to my channel: @ScrewsAndTools 🍖 My New Cooking channel! @screwsandtoolscooking Patreon: https://www.patreon.com/Screwsandtools Paypal: paypal.me/screwsandtools Facebook: https://www.facebook.com/scresandtools/ Instagram: https://www.instagram.com/screwsandtools/ #screwsandtools #dagger #restoration


Revive Your Blade Today
AI-recommended products based on this video

Ultra-Slim Bidet Attachment, Posterior&Feminine Wash-(Retractable Dual Nozzles), Non-Electric Bidet Attachment for Toilet Seat, Adjustable Fresh Cold Water Pressure, Stainless Steel Inlet (White)
Multi-Functional Vegetable Peeler for Kitchen,Vegetable Peeler Wooden Handle,2-in-1 Stainless Steel Fruit & Vegetable Peelers with Bottle Opener for Potato Pineapple (2PC)
Ultra-Slim Bidet Attachment, Posterior&Feminine Wash-(Retractable Dual Nozzles), Non-Electric Bidet Attachment for Toilet Seat, Adjustable Fresh Cold Water Pressure, Stainless Steel Inlet (White)